Tuesday, February 24, 2009

Rear Hoop and Axle Assembly

The rear hoop was bought pre-bent and assembled from the frame kit. I then partially notched and squared to the frame by measuring from each rear end to specified marks on the front frame rails. Once it was square it was tacked on and checked for square. Here is a picture of the partial notch and weld.


The reason for the partial notch was to keep the rear hoop section as long as possible. The rear end will be fairly short already, so to counter that I did the partial notch and did a minimal angle rise of the rear hoop. In turn, the upper aft tubes will be at a greater angle, thus giving the bike a higher seating stance.

The axle brackets were then squared and tacked onto the rear hoop. The rear bearings/holders and the 1" live axle were installed with the rear wheel to check clearances.
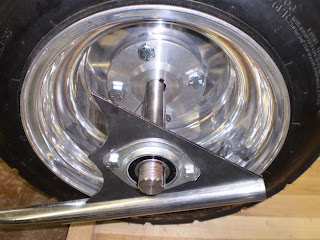
The rear wheel is a Custom Polished Aluminum Mini Chopper Wheel with a Kenda 140/90-10 tire. The 10x6 (3"+3" no offset) polished rim has a 4”x4” bolt pattern. The hub is a 1" billet aluminum hub assembled directly to the wheel.


Frame Rails Notched

The lower frame rails were notched for the neck to sit on. I used pre-made paper templates that were taped to the rails and then I used a hand grinder to notch them. I don't have a drill press tubing notcher just yet, so this was the best way that I found to get this correct. I know how important it is to get the neck tube straight, so the steering isn't affected, and this seemed to work very well.


I was also able to weld on the motor mount plate to the bottom of the frame rails. I would have done a full weld accross each side, but I plan to use body filler on the edges to give it a molded on look. I suppose I could weld and grind, weld and grind, but yet again I want to try something I don't know anything about.


Saturday, February 21, 2009

Lower Frame Rails

A crucial aspect to the build was getting the two lower frame rails tacked together at the correct angle. The lower frame is what everything else on the bike is going to be squared to and if this is messed up, the bike may not ride well, parts may not align and the look of the bike will most likely be compromised. I squared it by clamping the top of the two upper tubes and making an 11" spacer out of MDF. (Sorry no pics) Then when all the measurements lined up, I mocked it up on a board with a center line drawn down the center, making it a centering jig. When the rear was aligned with the front, I knew I would be able to tack on my braces. I aligned the rear by setting my MDF spacer right on the line of my centering jig and ran a plumb-bob down from the center of my upper frame rails until the angle was correct so that everything was aligned. I then tacked the frame to the braces and I was done. With what I had to work with and my experience, which was none, I think I did pretty well. I have a few pics that I took after I did this with the motor and a few other pieces very temporarily mocked up for your viewing pleasure.

The Frame

I received the frame kit and was thrilled that I was actually going to build this. The frame consists of all of the major frame parts and the parts to build a fork. The tubing itself is all 1" OD .120mm wall steel with the lower frame rails pre-bent. It includes laser cut triple-tree mounts and rear axle gussets, the neck tube with bearings, motor mount, rear hoop and upper aft tubes, down tube, seat brace, and the drag bars.

Friday, February 20, 2009

The Starting Point

I have always wanted to build a mini-chopper and until recently I was always a little reserved at starting one because of my lack of knowledge in all aspects of motorcycles. I have never driven a motorcycle, in fact the closest thing would be my dads 49cc Honda Spree from back in the day. I dream of one day building my own full size bobber, but again, I don't want to spend money on something I can build or a project that turns into a money pit. I have always enjoyed building thinks, probably one of the reasons why I became a Tech Ed teacher in the first place, but my interest was always in the areas of automotive and woodworking.

Well know I finally started, I ordered a non-assembled frame kit from Westcoastminichoppers.com and started buying other parts here and there from other online stores and eBay. I wanted to make this difficult, hence the frame kit and not a pre-welded one, but not too difficult from myself and the few students who will help me from my Advanced Metals class at school. I don't really have a specific budget, but I really want to keep this resonable. I don't have a plan for when I am done with it, I don't plan on selling it, but then again I'm not at that point where I can yet. I'll see how everything going and I am really excitied to get the ball rolling.